How it works
The below image shows a graphical representation of what this integration does.
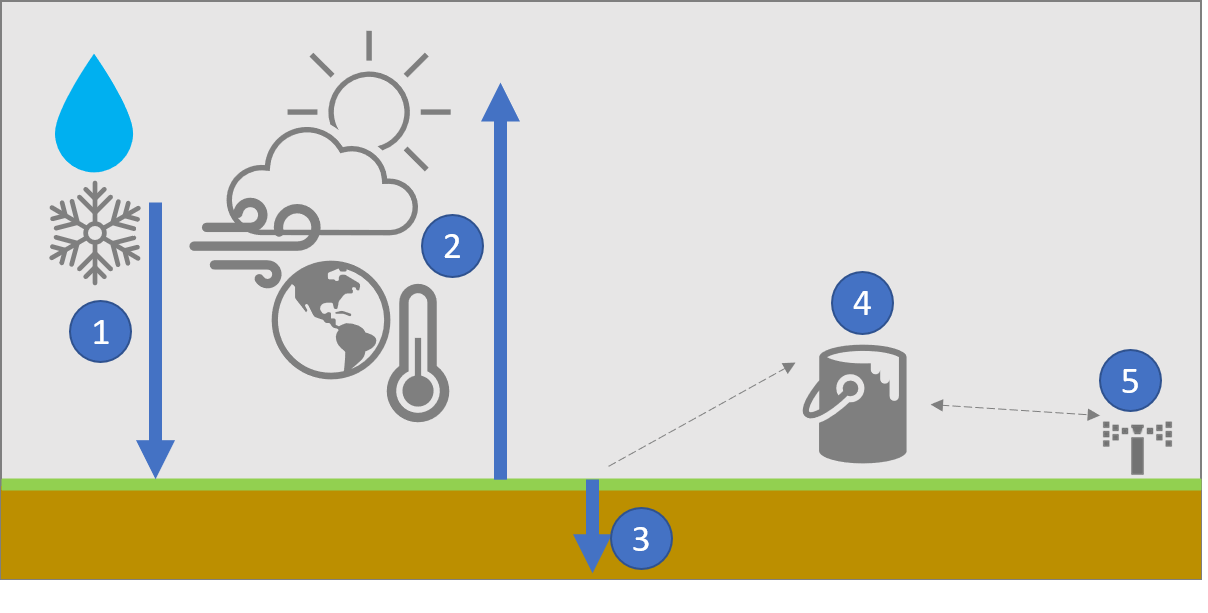
- Snow and rain fall on the ground add moisture. Together, this makes up the
precipitation. - Sunshine, temperature, wind speed, place on earth and other factors influence the amount of moisture lost from the ground(
evapotranspiration). - The difference between
precipitationandevapotranspirationis thedeltaornett precipitation: negative values mean more moisture is lost than gets added by rain/snow, while positive values mean more moisture is added by rain/snow than what evaporates. - At some point in the day (configurable) the
nett precipitationis added/substracted from thebucket,which starts as empty. The bucket is calculated using this formula: `old_bucket + nett precipitation. - If the bucket > 0, the
drainage rateis taken into the account (if set) and subtracted from the bucket value. The actual drainage rate is determined dynamically by the fraction the bucket is of the maximum bucket value, following hydraulic conductivity method of Brooks and Corey, Eq. 4-6 - If the
bucketis below zero, irrigation is required. - Irrigation should run for
sensor.smart_irrigation_[zone_name]seconds, which is 0 whenbucket >= 0or when the deficit is below the zone's irrigation threshold — deep and infrequent beats a daily trickle. - Afterwards the bucket has to be credited with the water that went in. Three ways, and you pick one: let Smart Irrigation open the valve itself, which credits the run it performed; let it watch the valve and credit any run of it; or call
credit_wateringfrom your own automation with how long the zone ran. Never two of them, or the water is counted twice. A blueprint does the third for you, per brand of controller.
The whole of what is published and when it changes is on one page: the output contract.
What the crop needs, not what a lawn of grass would
The evapotranspiration the equation computes is a reference: what a short,
well-watered grass surface would lose. A hedge, a vegetable bed and a lawn do
not lose the same, and the difference is the crop factor Kc, which is the
zone's multiplier:
ETc = ET0 x Kc
It is applied to the evapotranspiration, before the water balance. That order
matters, and it is worth saying why, because it used to be the other way round:
the factor was applied at the very end, to the duration. That scaled the whole
balance rather than the crop's water use, so a factor below 1 credited only that
fraction of the rain that fell, and the bucket kept draining at the full
reference rate — reaching any threshold about 1/Kc times too fast. No factor
applied at the end can undo a decision about when to water.
The panel asks what grows in the zone, in words, and writes the FAO-56 factor for the answer. Your own number wins if you set one.
Hour by hour, or once a day
The equation exists in two forms, and both are FAO-56.
The daily form runs once over the whole window, on its averages. The hourly form prices each hour of the window and adds them up. They are not the same number, because evapotranspiration is not linear in its terms: a cool humid night and a hot dry afternoon priced separately do not give what their averages give, and the separate answer is the right one. The daily equation is an average of a curve.
A new installation starts on the hourly form. One that existed before it arrived keeps the daily one until its owner switches, because the two give different numbers and nobody's watering should change on an update. The switch is under Settings > General, and what each form needs is documented there.
Either way the sun is the term the result is most sensitive to. A radiation sensor is best, a weather service that publishes radiation is next, and the day's temperature range is the last resort — the estimate FAO-56 gives for exactly that case.
Weekly behavior example
To understand how precipitation, nett precipitation, the bucket and irrigation interact, see let's look at an example behavior in a week.
With this you should be able to do a sanity check against your confiruation and make sure everything is working together.
The scenario is as follows: we will look at several days, including the precipitation and evapotranspiration for those days and the effects on the bucket and whether ot not irrigation should be triggered. Note that the values here are not representative of any real-life situation and the example below only uses one zone to keep things simple.
Initialization
Initially, the bucket is 0, so the duration for irrigation is set to 0s.
Variables used
P: PrecipitationEt: EvapotranspiationD: nett Precipitation or Delta (=P-Et)B: BucketBu: Bucket after calculation has happened (=B+D)Du: Duration for irrigation in seconds
Scenario
| Day | P |
Et |
D |
B |
Bu |
Du |
Notes |
|---|---|---|---|---|---|---|---|
| 1 | 0.5 |
0.1 |
0.4 |
0 |
0.4 |
0 |
P > Et so bucket increased from 0 to 0.4. Since Bu > 0 no irrigation is required |
| 2 | 0 |
0.6 |
-0.6 |
0.40 |
-0.2 |
180 |
P < Et, so bucket decreased from 0.4 to -0.2. Since Bu < 0` irrigation is required and bucket is reset afterwards |
| 3 | 1 |
0.2 |
0.8 |
0 (reset) |
0.8 |
0 |
No irrigation required |
| 4 | 0.2 |
0.4 |
-0.2 |
0.8 |
0.6 |
0 |
No irrigation required even though P < Et and bucket was decreased from 0.8 to 0.6 |
| 5 | 0 |
1.5 |
-1.5 |
0.6 |
-0.9 |
600 |
Since Bu < 0 irrigation is required and bucket is reset afterwards |
| 6 | 0 |
0.4 |
-0.4 |
0 (reset) |
-0.4 |
300 |
Since Bu < 0 irrigation is required and bucket is reset afterwards |
| 7 | 0.5 |
0.2 |
0.3 |
0 (reset) |
0.3 |
0 |
No irrigation required |
When to irrigate
You should irrigate when the irrigation tells you to, but keep in mind that for grass, experts say you should water deeply but infrequently to avoid overwatering and encourage deep rooting. It might be a good idea to create an automation that starts early enough to finish before sunrise and run that only once per week if duration is 0 or if the bucket < -25 mm (~1"). Adjust to your specific needs. See Example automation for examples.